Looking for a bold and dynamic quilt block that’s easy to piece? The Crab Claws block is a perfect choice! This striking 12″ block is made with just squares and flying geese units, making it a quick and satisfying sew. With its sharp angles and strong lines, it resembles both the pincers of a crab and the sturdy shape of wrenches – making it a fantastic design for ocean lovers or the perfect quilt gift for a mechanic or handy person. Whether you’re adding it to a sampler or sewing up an entire quilt, this traditionally pieced block comes together with ease. Let’s get started!
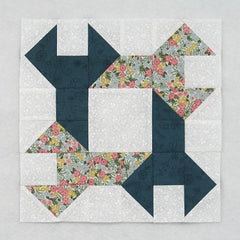
Fabric Requirements for a 12″ Finished Crab Claws Quilt Block:
- Light/White: 1 – 4.5″ square, and 20 – 2.5″ squares
- Medium/Floral: 4 – 2.5″ x 4.5″ rectangles, and 6 – 2.5″ squares
- Dark/Aqua: 4 – 2.5″ x 4.5″ rectangles, and 6 – 2.5″ squares

Sewing Directions:
Two-Patch Units:
Step 1:
Make four Two-Patch units using four Light/White 2.5″ squares and four Medium/Floral 2.5″ squares like the ones shown in the picture below. Press the seam allowance toward the Light/White fabric. (I pressed mine toward the medium fabric and then when piecing the last steps realized that seams would nest easier if these units were pressed toward the Light/White fabric.)

Step 2:
Repeat Step 1 only using the Dark/Aqua 2.5″ squares in place of the Medium/Floral squares.

Flying Geese Units:
We’re going to be making four different colorings of a Flying Geese block. For a detailed tutorial of my no-trim method for making perfect Flying Geese blocks check out https://quiltembroiderypdf.com/how-to-sew-a-basic-flying-geese-block.
Step 3:
Using two Medium/Floral 2.5″ x 4.5″ rectangles and four Light/White 2.5″ squares, sew together two Flying Geese units as shown below.

Step 4:
Using two Dark/Aqua 2.5″ x 4.5″ rectangles and four Light/White 2.5″ squares, sew together two Flying Geese units like the ones below.

Step 5:
Using two Medium/Floral 2.5″ x 4.5″ rectangles, two Light/White 2.5″ squares, and two Dark/Aqua 2.5″ squares, sew together two Flying Geese units as shown below.

Step 6:
Using two Dark/Aqua 2.5″ x 4.5″ rectangles, two Light/White 2.5″ squares, and two Medium/Floral 2.5″ squares, sew together two Flying Geese units like the ones in the picture shown below.

Corner Units:
Step 7:
Sew together a Step 1 and a Step 3 unit as shown in the picture below. Press the seam allowance away from the Flying Geese unit. Repeat for a total of two units.

Step 8:
Repeat Step 7 only using the Step 2 and Step 4 units.

Step 9:
Here’s a picture of the four Corner units.

Middle Units:
Step 10:
Sew together a Step 2 and a Step 5 unit as shown in the picture below. Press the seam allowance away from the Flying Geese unit. Repeat for a total of two units.

Step 11:
Repeat Step 10 only using the Step 1 and Step 6 units.

Step 12:
Here’s a picture showing the four Middle units.

Putting It All Together:
Step 13:
Lay out the Light/White 4.5″ square, the Corner units, and the Middle units as shown in the picture below. From here the block goes together like a basic Nine Patch block.

Step 14:
Sew the units into three rows as shown below.

Step 15:
Press the seam allowances away from the Middle units as shown.

Step 16:
Then sew the three rows together to complete the block.

Step 17:
And finally press the seam allowances toward the center of the block as shown by the picture below.

Layout Ideas:
This is your basic 4 x 4 layout.

And here it is with colored sashing and cornerstones added.

So I had to see what it might look like as a scrappy quilt! I would keep each block to three fabrics (light, medium, and dark) so I wouldn’t get confused with where each color goes when sewing the units.

This is an example using a simple chain block as an alternating block.

Here’s an on-point layout with dark sashing and cornerstones and background fabric used for the setting triangles.

And lastly I have another on-point example with a simple chain block alternating with the Crab Claws block and also extending into the setting triangles.
