The Air Castle quilt block, also known as Towers of Camelot, is a timeless design first published by the Ladies Art Company. This 12″ block is a striking mix of traditional elements—half-square triangles, quarter-square triangles, and a square-in-a-square unit—combined in a way that creates a bold, castle-like star motif.
What makes this block especially fun is the unique piecing method for the quarter-square triangle units, which gives the design extra movement and character. Whether you choose scrappy fabrics or a more planned color scheme, the Air Castle block is sure to add a touch of historic charm and geometric interest to your quilt.
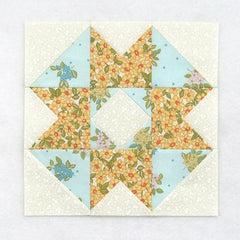
Fabric Requirements for a 12″ Finished Air Castle Quilt Block:
- Light/Cream: 1 – 5.5″ square, 2 – 5″ squares, and 1 – 4.5″ square
- Medium/Yellow: 1 – 5.5″ square, 2 – 5″ squares
- Medium/Blue: 2 – 5″ squares, and 4 – 2.5″ squares
- (I mis-figured the number of 5.5″ squares so the picture is inaccurate.)

Sewing Directions:
Half Square Triangle Units:
Step 1:
Using the two Light/Cream 5″ squares and the two Medium/Blue 5″ squares, sew together four Half Square Triangle units like the ones in the picture below. Press the seam allowances toward the Cream fabric. Trim/square up the units to 4.5″. You can find my tutorial for making basic Half Square Triangles at https://quiltembroiderypdf.com/how-to-sew-a-basic-half-square-triangle-block

Square in a Square Unit:
Step 2:
Using the Light/Cream 4.5″ square, and the four Medium/Blue 2.5″ squares “snowball” the corners of the Light/Cream 4.5″ square. I like to work on two opposite corners at a time. Click Square in a Square for a detailed tutorial on making this unit.
Here are the first steps:
- Mark a diagonal line from corner to corner on the back of the 2.5″ squares.
- Sew two Medium/Blue squares to opposite corners of the Light/Cream square along the marked line (top image). Note the orientation of the marked line.
- Match the corners of the 2.5″ squares and press (bottom image).

- Open up the 2.5″ squares and trim the seam allowances (top image).
- Refold (bottom image).

Step 3:
Repeat Step 2 on the remaining two corners of the Light/Cream square.

Castle Units:
Step 4:
Using the Light/Cream 5.5″ square and the Medium/Yellow 5.5″ square, make two Half-Square Triangle units. Press the seam allowance toward the Medium/Yellow fabric. You do not have to trim or square up these units at this time as we will trim at the end. However, if you prefer, you can trim/square up to 5″. You can find my tutorial for making basic Half Square Triangles at https://quiltembroiderypdf.com/how-to-sew-a-basic-half-square-triangle-block

Step 5:
Mark a diagonal line perpendicular to the seam line as shown in the picture below.

Step 6:
Match up one of the Step 5 Half-Square Triangle units with one of the remaining Medium/Yellow 5″ squares. The Half-Square Triangle unit will be a bit larger than the Medium/Yellow square but that’s okay as you will trim this unit up in a later step.

Step 7:
Sew 1/4″ from both sides of the marked line and then cut on the marked line as shown below.

Step 8:
Open up the two units to reveal this mash up of a Half-Square Triangle and a Quarter-Square Triangle unit as shown in the picture below. Press the seam allowance toward the larger Medium/Yellow triangle. Trim/square up the units to 4.5″ square.

Step 9:
Repeat Steps 5 through 8 for a total of four of these Castle units.

Putting It All Together:
Step 10:
Lay out the Half Square Triangle units, the Castle units, and the Square in a Square unit as shown in the picture below. From here the block goes together like a basic Nine Patch block.

Step 11:
