Bold, graphic, and surprisingly simple, the Empire Star quilt block is a unique star design. This 12″ block is constructed using just two units—hourglass blocks and snowballed rectangles—making it quick and and satisfying for confident beginners and experienced quilters who love clean construction. The clever combination of these simple elements creates a striking, modern star with strong lines and beautiful movement. In this tutorial, I’ll walk you step by step through building the Empire Star with confidence and precision.
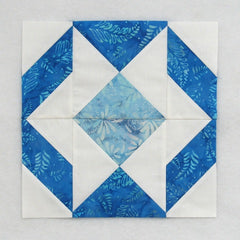
Fabric Requirements for a 12″ Finished Empire Star Quilt Block:
- Light/White: 2 – 7.5″ squares, and 8 – 3.5″ squares
- Medium/Blue: 1 – 7.5″ square
- Dark/Blue: 1 – 7.5″ square, and 4 – 3.5″ x 6.5″ rectangles

Sewing Directions:
Diagonal Stripe Units:
Step 1:
The Diagonal Stripe units are made in the same manner as a Flying Geese unit except that opposite corners are snowballed instead of adjacent corners.
Using the four Dark/Blue 3.5″ x 6.5″ rectangles, and eight White 3.5″ squares sew together four Diagonal Stripe units. In the pictures below you can see the first four steps using the White 3.5″ squares.
Note the orientation of the diagonal line. This is important!
- Mark a diagonal line from corner to corner on the back of the White 3.5″ squares.
- Sew a White 3.5″ square to the Dark/Blue rectangle along the marked line (left image). Note the orientation of the marked line. Because this is a larger size unit, I also sewed another seam about 1/2″ away from the marked line so I can get a bonus half square triangle!
- Match the corners of the White square and press (right image).

Step 2:
- Open the small square up and trim in between the stitching lines (left image).
- Refold (center image). You can also see the little bonus half square triangle that I can use in some other project (right image).

Step 3:

Step 4:

Step 5:

Hourglass Units:
Step 6:
Using the two Light/White 7.5″ squares, the Medium/Blue 7.5″ square, and the Dark/Blue 7.5″ square, sew together four Half Square Triangle units as shown in the picture below. You only need one of each coloring to complete the block. The other two can be used for making a second block or for a future project.
Press the seam allowances away from the Light/White fabric. No need to trim/square up these units at this time as we will trim in the next step.
You can find my tutorial for making basic Half Square Triangles at https://quiltembroiderypdf.com/how-to-sew-a-basic-half-square-triangle-block

Step 7:

Putting It All Together:
Step 8:

Step 9:

Step 10:

Step 11:

Step 12:

Layout Ideas:


