Today let’s look at the Monkey Wrench quilt block. It is an easy and quick block to sew together. The Monkey Wrench block has been around a long time – it was published in the Ohio Farmer in 1898 and was probably around before that! Of course, being it’s been around a long time, the Monkey Wrench goes by a bunch of other names – Double Wrench, Alaska Homestead, Dragon’s Head, Hole in the Barn Door – to name a few.
The Monkey Wrench is a variation of the Churn Dash quilt block and goes by that name as well! The difference between the two blocks is that the middle row/column is narrower in the Monkey Wrench.
Let’s get started on this easy beginner block!
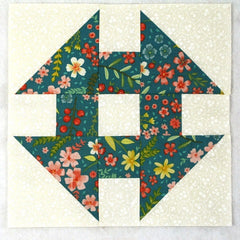
Fabric Requirements for a 10″ Finished Monkey Wrench Quilt Block:
- Light/Ivory: 2 – 5″ squares, and 5 – 2.5″ squares
- Dark/Teal: 2 – 5″ squares, and 4 – 2.5″ squares

Sewing Directions:
Half Square Triangle Units:
Step 1:
Using the two Light/Ivory 5″ squares and the two Dark/Teal 5″ squares, sew together four Half Square Triangle units as shown in the picture below. You can find my tutorial for making a basic Half Square Triangle block at https://quiltembroiderypdf.com/how-to-sew-a-basic-half-square-triangle-block

Two Patch Unit:
Step 2:
Using the picture below as a reference, sew together a Light/Ivory 2.5″ square and a Dark/Teal 2.5″ square. Press the seam allowance toward the Dark/Teal fabric. Repeat for a total of four Two Patch units.

Putting It All Together:
Step 3:
Now you can lay out the Half Square Triangle units, the Two Patch units, and the remaining Light/Ivory 2.5″ square as shown in the picture below.

Step 4:
From here the Monkey Wrench goes together like an uneven Nine Patch block. First you need to sew the patches into three rows as shown below.

Step 5:
Press the seam allowances toward the Two Patch units as shown in the picture below.

Step 6:
And lastly, sew the three rows together as shown below.

Step 7:
And press the seam allowances. You can see that I’ve pressed my seam allowances away from the center of the block but you could press however you like. You’re done! Told you it was quick!

Layout Ideas:


