Today let’s sew together this easy Railroad quilt block. With only half square triangles and four-patches, this block goes together quickly and easily. I decided to do this block as a scrappy block and I think it turned out great but you could certainly do it with only a light and a dark or medium fabric. Let’s get started!
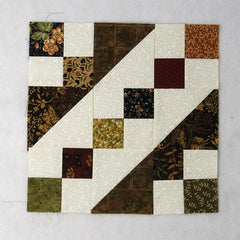
Fabric Requirements for a 12″ Finished Railroad Quilt Block:
- Light/Ivory: 2 – 5″ squares, and 10 – 2.5″ squares
- Dark/Medium: 2 – 5″ squares, and 10 – 2.5″ squares

Sewing Directions:
Half Square Triangle Units:
Step 1:
Using the Light/Ivory 5″ squares and Dark/Medium 5″ squares, sew together four Half Square Triangle units as shown below. Trim/square up the Half Square Triangle units to 4.5″ square. You can find my tutorial for making Half Square Triangles at https://quiltembroiderypdf.com/how-to-sew-a-basic-half-square-triangle-block.

Four Patch Units:
Step 2:
Now you can make five Four Patch units using the Light/Ivory 2.5″ squares and Dark/Medium 2.5″ squares as shown in the picture below. You will find my Four Patch tutorial at https://quiltembroiderypdf.com/how-to-sew-a-basic-four-patch-quilt-block.

Putting It All Together:
Step 3:
Lay out the Half Square Triangle units and the Four Patch units as shown in the picture below.

Step 4:
The Railroad quilt block goes together just like a basic Nine Patch block – sew the units together in three rows as shown below.

Step 5:
Press the seam allowances toward the Half Square Triangle units as you can see in the picture below.

Step 6:
Now sew the three rows together and…

Step 7:
Press the seam allowances away from the center of the block as shown below. You’re done! Told you it was easy!

Layout Ideas:


