Today let’s look at this scrappy quilt block called Old Grey Goose. It is pretty easy to put together and is a great way to use up those scraps you’ve been saving! Additionally, I have an alternate method for completing this block that I’ll show you at the end. Let’s get sewing!
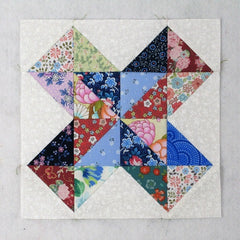
Fabric Requirements for an 8″ Finished Old Grey Goose Quilt Block:
- Light/White: 4 – 2.5″ x 4.5″ rectangles, and 2 – 3″ squares
- Assorted Medium/Dark: 6 – 3″ squares, and 8 – 2.5″ squares

Sewing Directions:
Half Square Triangle Units:
Step 1:
Using four of the Assorted Medium/Dark 3″ squares, sew together four Half Square Triangle units as shown in the picture below. Press the seam allowance toward the darker fabric. Trim/square up the units to 2.5″ square. You will find my tutorial for sewing a basic Half Square Triangle (HST) at https://quiltembroiderypdf.com/how-to-sew-a-basic-half-square-triangle-block

Step 2:
Using the two Light/White 3″ squares and the two remaining Medium/Dark 3″ squares, sew together four Half Square Triangle units like the ones shown below. Press the seam allowances toward the Light/White fabric. Trim/square up the units to 2.5″ square.

Center Unit:
Step 3:
Lay out the Step 1 Half Square Triangle units as shown in the picture below. Note that the identical units are across from each other.

Step 4:
Now you can sew the HSTs together like a typical Four Patch block. Sew the HST units into two rows as shown in the picture below.

Step 5:
And press the seam allowances toward the lighter fabrics as shown in the picture below.

Step 6:
Now you can sew the two rows together as shown below.

Step 7:
And press the seam allowance. As you can see in the picture below, I’ve used the tweak/twirl/furl method for pressing.

Flying Geese Units:
Step 8:
Using the four Light/White 2.5″ x 4.5″ rectangles and the eight Assorted Medium/Dark 2.5″ squares, sew together four scrappy Flying Geese units as shown in the picture below. You can find my method for making Flying Geese at https://quiltembroiderypdf.com/how-to-sew-a-basic-flying-geese-block

Putting It All Together:
Step 9:
Using the picture below as a reference, lay out the Center Unit, the Flying Geese units, and the Step 2 Half Square Triangle units.

Step 10:
From here the Old Grey Goose block goes together like an uneven Nine Patch block. Sew the units into three rows as shown below.

Step 11:
Press the seam allowances toward the Flying Geese units as shown below.

Step 12:
And sew the three rows together to complete the block!

Step 13:
Press the seam allowances away from the center of the block as shown in the picture below. You’re done!

Alternate Method of Construction:
Step 1:
The Old Grey Goose quilt block can be constructed entirely of Half Square Triangles. Which is great if you have a bunch of leftover HSTs from some other project. Here is a picture of the layout.
- You can see that I’ve separated them into 4 four patches with the two color HSTs toward the center and the print/white HSTs on the outside.
- Be sure to have the seam allowance in the two color HSTs going in the same direction so that the seams nest nicely in the finished block.
- I did press the seam allowance on the four outer corner HSTs toward the white fabric.

Step 2:
Sew together each of the Four Patch units into two rows and press the seam allowances as shown in the top right image below.
Then sew the two rows together and press the seam allowance using the tweak/twirl/furl method of pressing (bottom two images).

Step 3:

Step 4:

Step 5:

Step 6:

Step 7:

Layout Ideas:
This is an example of the basic 4 x 4 layout.


