Today let’s look at this cute 8″ block called Rolling Star. This Rolling Star quilt block is an easy block to piece together. If you can snowball a corner, you’re good to go on this block! Let’s get started!
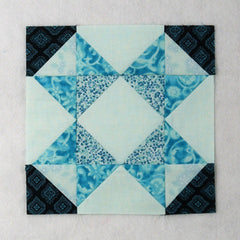
Fabric Requirements for an 8″ Finished Rolling Star Quilt Block:
- Light/Solid Aqua: 1 – 4.5″ square, and 4 – 2.5″ x 4.5″ rectangles
- Medium 1/Light Aqua: 2 – 3″ squares
- Medium 2/Aqua Print: 4 – 2.5″ squares
- Medium 3/Dark Aqua: 8 – 2.5″ squares
- Dark/Navy: 2 – 3″ squares

Sewing Directions:
Center Unit:
Step 1:
Using the Light 4.5″ square and the four Medium 2 – 2.5″ squares, sew together a Square in a Square unit as shown in the picture below. You can find my tutorial for making a basic Square in a Square block at https://quiltembroiderypdf.com/how-to-sew-a-basic-square-in-a-square-block

Half Square Triangle Units:
Step 2:
Next you need to make four Half Square Triangle units using the Medium 1 – 3″ squares and the Dark 3″ squares as shown below. Press the seam allowances toward the Dark fabric. Trim/square up the units to 2.5″ square. You can find the tutorial for making a basic Half Square Triangle (HST) at https://quiltembroiderypdf.com/how-to-sew-a-basic-half-square-triangle-block

Flying Geese Units:
Step 3:
This is the last unit for the Rolling Star. Using the four Light 2.5″ x 4.5″ rectangles and the eight Medium 3 – 2.5″ squares, sew together four Flying Geese units. Basically, you will be snowballing two corners of a rectangle – that’s not so hard. You can find my method for making the Flying Geese block at https://quiltembroiderypdf.com/how-to-sew-a-basic-flying-geese-block


Putting It All Together:
Step 4:
Lay out the Center unit, the Half Square Triangle units, and the Flying Geese units as shown in the picture below.

Step 5:
From here the Rolling Star block goes together like a typical Nine Patch block. Sew the units together into three rows as shown in the picture below.

Step 6:
Press the seam allowances toward the Flying Geese units as shown below.

Step 7:
All that’s left is to sew the three rows together, and…

Step 8:
Press the seam allowances away from the center of the block as shown in the picture below. You’re done!

Layout Ideas:


