Today let’s look at a second version of the Loop the Loop quilt block. A few days ago I did a tutorial for the Loop the Loop block and realized there was more than one way to sew it together. (You can check out the first version at https://quiltembroiderypdf.com/free-tutorial-loop-the-loop-quilt-block. I now have a PDF pattern available of the first version in my Etsy shop. Check it out at: LOOPTHELOOP.)
I think this is an easy block to sew together especially since you don’t have seams to match up. So here’s version 2.0!
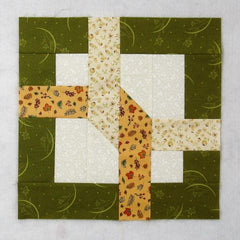
Fabric Requirements for a 12″ Finished Loop the Loop (Version 2.0) Quilt Block:
- Light/Ivory: 4 – 2.5″ x 4.5″ rectangles, and 2 – 2.5″ squares
- Light/Gold: 1 – 2.5″ x 8.5″ rectangle, and 1 – 2.5″ x 4.5″ rectangle
- Medium/Gold: 1 – 2.5″ x 8.5″ rectangle, and 1 – 2.5″ x 4.5″ rectangle
- Dark/Green: 2 – 2.5″ x 6.5″ rectangles, 4 – 2.5″ x 4.5″ rectangles, and 2 – 2.5″ squares

Sewing Directions:
Strip Units:
Step 1:
On the back of a Light/Ivory 2.5″ x 4.5″ rectangle mark a 45 degree diagonal line from the bottom right corner toward the center. Sew the rectangle to the Light/Gold 2.5″ x 8.5″ rectangle along the marked line as shown in the left image. Make sure you have the orientation of the fabrics and marked line as shown. Repeat with the Medium/Gold 2.5″ x 8.5″ rectangle.
Fold the Light/Ivory rectangle along the marked line and press (right image). Also repeat with the Medium/Gold and Light/Ivory strip.

Step 2:
Trim away the excess seam allowance and refold as shown in the picture below.

Three Patch Units:
Step 3:
Sew together the Light/Ivory 2.5″ squares with the Dark/Green 2.5″ squares and press the seam allowance toward the Dark/Green fabric as shown below. Repeat for a total of two units.

Step 4:
Sew a Dark/Green 2.5″ x 4.5″ rectangle to one of the Step 3 two patch units and press the seam allowance toward the Dark/Green rectangle as shown in the picture below. Repeat for a total of 2 Three Patch units. Make sure you have your orientation of the fabrics as shown.

Rectangle Units:
Step 5:
Sew a Dark/Green 2.5″ x 4.5″ rectangle to a Light/Ivory 2.5″ x 4.5″ rectangle and press the seam allowance toward the Dark/Green rectangle as shown in the picture below. Repeat for a total of two units.

Step 6:
Lay out and sew together one Step 4 Three Patch unit, a Step 5 unit, and the Light/Gold 2.5″ x 4.5″ rectangle as shown in the left image below. Repeat substituting the Medium/Gold 2.5″ x 4.5″ rectangle for the Light/Gold rectangle. Press the seam allowances toward the center of the unit as shown in the left image below.

Putting It All Together:
Step 7:
Match up the Step 6 units with the Step 2 Strip units as shown in the picture below.

Step 8:
Sew the Steps 2 and 6 units together and press the seam allowance toward the Step 2 unit as shown in the picture below. You will have two units.

Step 9:
Sew a Dark/Green 2.5″ x 6.5″ rectangle to the bottom of each of the Step 8 units as shown below. Press the seam allowance toward the Dark/Green rectangle. You how have two halves of the block.

Step 10:
Rotate one half block 180 degrees so it looks like the picture below.

Step 11:
Sew the two halves together and…

Step 12:
Press the seam allowance whichever direction you prefer – even open if you want. You’re done!

This block makes an awesome quilt! For layout examples check out the first tutorial at https://quiltembroiderypdf.com/free-tutorial-loop-the-loop-quilt-block