Today let’s learn how to make this easy traditional block called Nine Patch Star. The beauty of this block is the star that appears when it’s made into a quilt! Let’s get sewing!
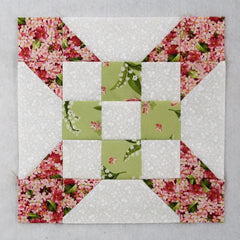
Fabric Requirements for a 10″ Finished Nine Patch Star Quilt Block:
- Light/White: 4 – 2.5″ x 6.5″ rectangles, and 5 – 2.5″ squares
- Medium/Green: 4 – 2.5″ squares
- Dark/Pink: 12 – 2.5″ squares

Sewing Directions:
Nine Patch Unit:
Step 1:
Lay out the Medium/Green 2.5″ squares and the Light/White 2.5″ squares in the typical Nine Patch configuration as shown in the picture below. If you are making multiple blocks, there are other quicker ways to make a Nine Patch block which you can read about in my tutorial for the basic Nine Patch block at https://quiltembroiderypdf.com/how-to-sew-a-basic-nine-patch-quilt-block

Step 2:
Sew the squares into three rows as shown below.

Step 3:
Press the seam allowances toward the Medium/Green squares as shown in the picture below.

Step 4:
Sew the three rows together as shown.

Step 5:
Press the seam allowances toward the center of the unit as shown in the picture below.

Modified Flying Geese Units:
Step 6:
The only difference between this Modified Flying Geese unit and a basic Flying Geese block is that the rectangle used is longer.
- Mark a diagonal line from corner to corner on the back of 8 of the Dark/Pink 2.5″ squares.
- Place a Dark/Pink 2.5″ square on each end of a Light/White 2.5″ x 6.5″ rectangle and sew along the marked line. Make sure to keep the the diagonal line going in the correct direction. (Top image)
- Match up the corners of the Dark/Pink 2.5″ squares and press. (Second image)
- Trim away the excess seam allowance. (Third image)
- Refold (Bottom image)
Repeat for a total of 4 Modified Flying Geese units.

Putting It All Together:
Step 7:
Lay out the center Nine Patch unit, the Modified Flying Geese units, and the 4 remaining Dark/Pink 2.5″ squares as shown in the picture below.

Step 8:
Sew the units into three rows as shown.

Step 9:
Press the seam allowances away from the Modified Flying Geese units as shown below.

Step 10:
Sew those rows together and…

Step 11:
Press the seam allowances toward the center of the block as shown in the picture below. Easy peasy!

Layout Options:
Here’s where this block “shines”.
The basic 4 x 4 layout.

Here’s the same basic 4 x 4 layout but the corner squares of the block are made using two different prints.

In this layout, the Light/White 2.5″ squares have been replaced with light blue squares.

Here’s a layout using sashing and cornerstones with the basic two-color plus background block. Completely changes the look.

In this sashing and cornerstone example, the Light/White 2.5″ squares have been substituted with light blue squares.

I had to show you what an on point layout looks like. Doesn’t even look like the same block!
