Welcome to the Beginner’s Choice Quilt Block tutorial! This super easy, scrappy version is perfect for quilters of all levels, especially beginners. In this tutorial, you’ll learn how to create a vibrant and charming quilt block that forms a stunning star pattern when four blocks are sewn together. Using a variety of fabric scraps, this project is a great way to utilize leftover pieces while creating a visually captivating design. Let’s get started on this fun and rewarding quilting journey!
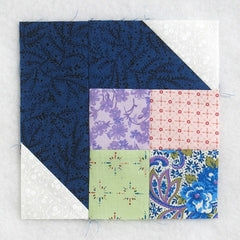
Fabric Requirements for a 6″ Finished Beginner’s Choice Quilt Block:
- Light/White: 2 – 2.5″ squares
- Assorted Prints: 4 – 2.5″ squares
- Dark/Blue: 1 – 2.5″ x 4.5″ rectangle, and 1 – 2.5″ x 6.5″ rectangle

Sewing Directions:
Snowballed Rectangles:
Step 1:

Step 2:

Step 3:

Step 4:

Step 5:

Four Patch Unit:
Step 6:

Step 7:

Putting It All Together:
Step 8:
Using the picture below for reference, sew the shorter Snowballed Rectangle to the Four Patch unit.

Step 9:
Press the seam allowance toward the Four Patch unit as shown.

Step 10:
To finish the block, sew the longer Rectangle unit to the Step 9 unit as shown in the picture below.

Step 11:
Press the seam allowance toward the Step 9 unit as shown.

Layout Ideas:
Here is the typical 4 x 4 layout where the blocks are rotated to make stars that are set off by scrappy 16-patch “blocks”.

This example has two different colored blocks arranged to make arrow points.

This version is the same as the first only with sashing and cornerstones added.

This is an on-point layout with the blocks rotated to make an uneven star pattern.

This example is another on-point layout that is more symetrical than the previous one. I added an extra row at the bottom to balance the design from top to bottom.

This is a 5 x 5 on-point layout where the blocks are rotated with sashing and cornerstones added in. I think this is the most interesting layout even though it is a bit busy.
