Welcome to this step-by-step tutorial on creating the Attic Window quilt block, also known as the Garret Window. Unlike the traditional Attic Window block, this version boasts a simple yet unique layout that offers a variety of design possibilities. Perfect for quilters of all skill levels, this block is made exclusively from half-square triangles and squares, ensuring an easy and enjoyable quilting experience. In this tutorial, I’ll provide clear cutting instructions for 6″, 9″, and 12″ blocks, allowing you to customize your project to your desired size. Let’s dive in and explore the creativity and simplicity of the Attic Window quilt block!
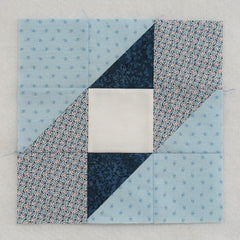
Fabric Requirements for a 12″ Finished Attic Window (aka Garret Window) Quilt Block:
- Light/White: 1 – 4.5″ square
- Light Blue: 2 – 5″ squares, and 2 – 4.5″ squares
- Medium Blue: 1 – 5″ square, and 2 – 4.5″ squares
- Dark Blue: 1 – 5″ square

For a 6″ finished block you will need the following:
- Light/White: 1 – 2.5″ square
- Light Blue: 2 – 3″ squares, and 2 – 2.5″ squares
- Medium Blue: 1 – 3″ square, and 2 – 2.5″ squares
- Dark Blue: 1 – 3″ square
For a 9″ finished block you will need the following:
- Light/White: 1 – 3.5″ square
- Light Blue: 2 – 4″ squares, and 2 – 3.5″ squares
- Medium Blue: 1 – 4″ square, and 2 – 3.5″ squares
- Dark Blue: 1 – 4″ square
Sewing Directions for a 12″ Finished Block:
Half Square Triangle Units:
Step 1:
Using a Light Blue 5″ square and the Dark Blue 5″ square, sew together two Half Square Triangle units. Press the seam allowance toward the Dark Blue fabric. Trim/square up the units to 4.5″ squares.

You can find a detailed tutorial for sewing Half Square Triangles (HST) at https://quiltembroiderypdf.com/how-to-sew-a-basic-half-square-triangle-block

Step 2:
Repeat Step 1 only using a Light Blue 5″ square and the Medium Blue 5″ square.

Also, it will be helpful later to press the seam allowance toward the Light Blue fabric.

Putting It All Together:
Step 3:
Lay out the Step 1 and Step 2 Half Square Triangle units, the Light/White 4.5″ square, the Light Blue 4.5″ squares, and the Medium Blue 4.5″ squares as shown in the picture below. From here on, the block goes together like a typical Nine Patch block.

Step 4:
Sew the units into three rows.

Step 5:
Press the seam allowances away from the Half Square Triangle units as shown.

Step 6:
Sew the three rows together to complete the block.

Step 7:
Press the seam allowances toward the center of the block as shown in the picture below. Wow, that was quick!

Layout Ideas:
Here’s the typical 4 x 4 layout using colors similar to the tutorial.

Here’s the same layout as above but every other block is rotated. What a difference!

In this version, I added a narrow sashing and cornerstones to the previous layout. The diamonds and star designs are still there – just broken up a bit.

In this example, two different color blocks are used. I like how an on-point Hourglass unit shows up.

Here’s an on-point layout with two different color blocks and rotating every other block.

Here’s the same layout but with narrow sashing and cornerstones added, and light setting triangles.

Of course I had to see what a scrappy version would look like. Each block is monochromatic – light, medium, and dark of the same color with a white center square.

This example is an on-point, scrappy layout with dark sashing and cornerstones and light blue setting triangles. Also, the blocks are all orientated in the same direction (no rotating of blocks).

How about combining 6″ and 12″ blocks?
