Hello, quilt enthusiasts! Today, we’re diving into the charming world of the Mosaic #13 quilt block. This delightful block, which is part of the historic series originally introduced by the Ladies Art Company, features a captivating pinwheel and star design at its heart—reminiscent of those playful pinwheel toys from childhood. Whether you choose modern or traditional fabrics, the Mosaic #13 block is sure to add a dash of whimsy and elegance to your quilting projects. So, gather your materials, and let’s start stitching this beautiful pattern together!
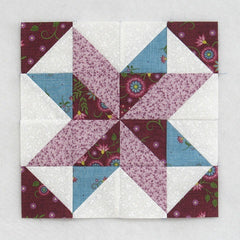
Fabric Requirements for a 12″ Finished Mosaic #13 Quilt Block:
- Light/White: 6 – 4″ squares
- Medium/Purple: 4 – 4″ squares
- Medium/Blue: 2 – 4″ squares
- Dark/Burgundy: 4 – 4″ squares

Sewing Directions:
Half Square Triangles:
Step 1:
- Match up a White square and a Burgundy square right sides together. Mark a diagonal line from corner to corner on the back of the White square and sew 1/4″ (or a little less) on each side of the line.
- Cut along the diagonal line. You will have 2 half-square triangle patches.
- Open up the patch and press the seam allowance toward the Burgundy fabric.
- Square up/trim the units to 3.5″ square.

Step 2:

Step 3:
Repeat Steps 1 and 2 only substituting the Medium/Blue for the Burgundy fabric. Press the seam allowances toward the White fabric.

Step 4:
Repeat Steps 1 and 2 only substituting the Medium/Purple for the Burgundy fabric. Press the seam allowances toward the Purple fabric.

Step 5:
Repeat Steps 1 and 2 only substituting the Medium/Purple for the White fabric. Press the seam allowances toward the Burgundy fabric.

Putting It All Together:
Step 6:
Lay out all the Half Square Triangle units as shown in the picture below.

Step 7:
Sew the units into four rows as shown below.

Step 8:
Press the seam allowance in opposite directions from row to row. You can see in the picture below that I’ve pressed rows 1 and 3 toward the left and rows 2 and 4 are pressed toward the right.

Step 9:
Sew the four rows together.

Step 10:
Press the seam allowances whichever direction you wish. I’ve pressed the middle one using the tweak/twirl/furl method and the outer two are pressed toward the center. You’re finished!

Layout Ideas:
Here’s your basic 4 x 4 layout with similar colors to the tutorial:

This is the same layout but with a 1.5″ sashing and cornerstones added.

This monochromatic example has a different Mosaic block used as an alternating block for a lovely design.

A simple chain block is used as the alternating block in this version.

This is an on-point layout in warm colors with plain background setting triangles.

In this on-point layout another simple chain block was used for the alternating block and for the setting triangles.
