Welcome to this beginner-friendly tutorial for the Mosaic #11 quilt block, a timeless and traditional design that’s perfect for quilters of all skill levels. In this tutorial, we’ll walk you through creating this beautiful block using only half-square triangles (HSTs), making it simple and approachable for beginners. Whether you’re just starting out or looking for a quick and easy project, the Mosaic #11 quilt block offers a classic pattern with endless color possibilities. Let’s dive in and get started with this versatile and easy-to-assemble quilt block!
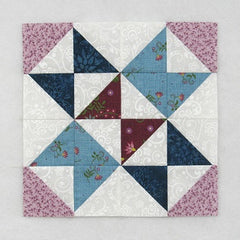
Fabric Requirements for a 12″ Finished Mosaic #11 Quilt Block:
- Light/White: 8 – 4″ squares
- Medium/Blue: 3 – 4″ squares
- Medium/Purple: 2 – 4″ squares
- Dark/Burgundy: 1 – 4″ square
- Dark/Blue: 2 – 4″ squares

Sewing Directions:
Half Square Triangles:
Step 1:
Using three Light/White 4″ squares and three Medium/Blue 4″ squares, make Half Square Triangle units as shown. Here are the steps corresponding to the images in the picture below by going from left to right, top to bottom.
- Match up a Light/White square and a Medium/Blue square right sides together. Mark a diagonal line from corner to corner on the back of the Light/White square and sew 1/4″ (or a little less) on each side of the line.
- Cut along the diagonal line. You will have 2 half-square triangle patches.
- Open up the patch and press the seam allowance toward the Medium/Blue fabric.
- Square up/trim the units to 3.5″ square.

Step 2:
Repeat for a total of six White/Medium Blue Half Square Triangle units.
You can find a detailed tutorial for sewing Half Square Triangles (HST) at https://quiltembroiderypdf.com/how-to-sew-a-basic-half-square-triangle-block

Step 3:
Repeat Steps 1 and 2 only substituting the Medium/Purple for the Medium/Blue fabric. Press the seam allowances toward the Purple fabric.

Step 4:
Repeat Steps 1 and 2 only using two Light/White 4″ squares and two Dark/Blue 4″ squares for a total of four White/Dark Blue Half Square Triangle units. Press the seam allowances toward the Dark/Blue fabric.

Step 5:
Repeat Steps 1 and 2 only substituting the Dark/Burgundy for the Medium/Blue fabric. Press the seam allowances toward the Burgundy fabric.

Putting It All Together:
Step 6:
Lay out all the Half Square Triangle units as shown in the picture below.

Step 7:
Sew the units into four rows as shown below.

Step 8:
Press the seam allowance in opposite directions from row to row. You can see in the picture below that I’ve pressed rows 1 and 3 toward the left and rows 2 and 4 are pressed toward the right.

Step 9:
To complete the block sew the four rows together.

Step 10:
Press the seam allowances whichever direction you wish. I’ve pressed the top two toward the top and the bottom one toward the bottom of the block. You’re finished!

Layout Ideas:
Here is your basic 4 x 4 layout using colors like the ones in the tutorial.

Look at what happens when you rotate every other block!

This example is the above layout but with sashing and cornerstones added.

For this version, I used a simple alternating chain block.

This example uses a different mosaic block as the alternating block.

And this one uses another Mosaic block as the alternating block.

Here’s an example of the same blocks as above but set on-point with plain fabric for the setting triangles.

This is another on-point layout with dark sashing and cornerstones and plain background fabric for the setting triangles.
