The Double Four Patch quilt block is a classic design that’s as versatile as it is simple to sew! This easy variation comes together quickly, making it perfect for beginners and a fantastic stash-buster for experienced quilters. With multiple layout possibilities and endless color combinations, you can create anything from a bold, modern design to a timeless, scrappy look.
Whether you’re looking for a fast weekend project or a way to use up your fabric leftovers, this block is a great go-to. Let’s dive in and stitch up this quick and charming quilt block!
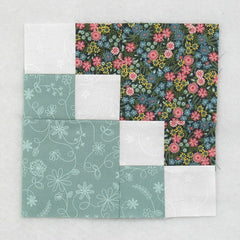
Update: I now have a PDF quilt pattern available using the Double Four Patch block. Click on this link to learn more about it: DOUBLE4PATCH
Fabric Requirements for an 8″ Finished Double Four Patch Variation Quilt Block:
- Light/White: 4 – 2.5″ squares
- Medium/Green: 1 – 4.5″ square, and 2 – 2.5″ squares
- Dark/Green: 1 – 4.5″ square, and 2 – 2.5″ squares

Sewing Directions:
Small Four Patch Units:
Step 1:
Lay out two Light/White 2.5″ squares, one Medium/Green 2.5″ square and one Dark/Green 2.5″ as shown in the left image. This is the basic four-patch block.
Sew the units into two rows and press the seam allowances away from the White fabric.

Step 2:
Sew the two rows together and press the seam allowance. You can see that I’ve used the tweak/twirl/furl method for pressing but you can press whichever way you like. Repeat for a total of two units.

Step 3:
Lay out the two Step 2 units, the Medium/Green 4.5″ square, and the Dark/Green 4.5″ square as shown in the picture below.

Step 4:
Sew the units into two rows.

Step 5:
Press the seam allowances toward the 4.5″ squares as shown in the picture below.

Step 6:
Sew the two rows together to complete the block.

Step 7:
Press the seam allowances. Once again you can see in the picture below that I’ve pressed with the tweak/twirl/furl method but you can press how you like.

That went together so fast that I couldn’t stop at just one block!

Layout Ideas:
Here’s your basic 4 x 4 layout using colors similar to the tutorial. Kind of boring.

And this is the same block and layout only the blocks are rotated. Much more interesting.

This example is a scrappy version in a 5 x 5 layout. My favorite!

This version uses a two-color layout with alternating blocks that have opposite coloring. Nice look.

So this is the same layout as the previous example except sashing and cornerstones were added.

And this is a scrappy version of the two-color block.

See what happens when you use black instead of white in the block? So striking!

This is an on-point layout with colors similar to the tutorial. It always amazes me how setting a block on-point can make the quilt look so different!
