Looking for a charming and versatile quilt block to add to your collection? This Cups and Saucers variation block is a fun and beginner-friendly pattern that finishes at 12″ square, using only squares, half-square triangles, and a simple snowballing technique.
With simple piecing and endless color possibilities, this block can be made with just two contrasting fabrics or go all out with a scrappy look. Plus, when multiple blocks are sewn together, the design creates intriguing secondary patterns that add visual interest to your quilt. Let’s dive into this easy tutorial and bring your Cups and Saucers block to life!
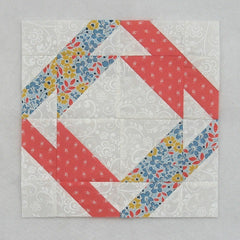
Fabric Requirements for a 12″ Finished Cups and Saucers Quilt Block:
- Light/White: 2 – 5″ squares, and 20 – 2.5″ squares
- Blue Print: 1 – 5″ square, and 4 – 2.5″ x 4.5″ rectangles
- Pink Print: 1 – 5″ square, and 4 – 2.5″ x 4.5″ rectangles

Sewing Directions:
Half Square Triangle Units:
Step 1:
- Using the Light/White 5″ squares, the Blue Print 5″ square, and the Pink Print 5″ square, sew together four Half Square Triangle units like the ones shown in the picture below.
- Press the seam allowances of two the HSTs toward the White fabric (in my case the White/Blue HST).
- Press the seam allowances of the other two HSTs (in my case the White/Pink units) away from the White fabric.
- You can find my tutorial for making HST units at https://quiltembroiderypdf.com/how-to-sew-a-basic-half-square-triangle-block

Diagonal Stripe Units:
Step 2:
The Diagonal Stripe units are made in the same manner as a Flying Geese unit except that opposite corners are used instead of adjacent corners.
Using two Pink Print 2.5″ x 4.5″ rectangles, and four Light/White 2.5″ squares sew together two Diagonal Stripe units. In the picture below you can see the first two steps.
Note the orientation of the diagonal line. This is important!
- Mark a diagonal line from corner to corner on the back of the Light/White 2.5″ squares.
- Sew a Light/White 2.5″ square to the Pink Print rectangle along the marked line (top image). Note the orientation of the marked line. This is “snowballing” the upper left corner of the rectangle.
- Match the corners of the White square and press (second image).
