The Dublin Steps quilt block is a fun and easy design that adds striking movement to any quilt layout. Made entirely with half-square triangles and squares, this 12″ block comes together quickly and creates a bold diagonal pattern that’s perfect for showcasing contrast and color placement. The Dublin Steps is a great choice for beginners and seasoned quilters alike. Let’s walk through how to make this eye-catching block step by step!
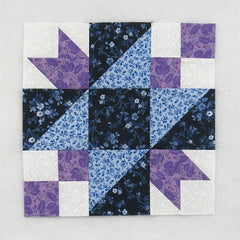
Fabric Requirements for a 12″ Finished Dublin Steps Quilt Block:
- Light/White: 2 – 3″ squares, and 6 – 2.5″ squares
- Medium/Blue: 2 – 5″ squares
- Dark/Purple: 2 – 3″ squares, and 6 – 2.5″ squares
- Dark/Blue: 2 – 5″ squares, and 1 – 4.5″ square

Sewing Directions:
Four Patch Units:
Step 1:
Lay out two Light/White 2.5″ squares and two Dark/Purple 2.5″ squares as shown in the picture below.
- Sew the squares into two rows and press the seam allowances toward the Dark/Purple fabric.
- Sew the two rows together and press the seam allowance. I’ve pressed using the tweak/twirl/furl method but you can press however you prefer.
- Repeat for a total of two Four Patch units.
For other methods of making a Four Patch block check out my tutorial at https://quiltembroiderypdf.com/how-to-sew-a-basic-four-patch-quilt-block

Half Square Triangle Units:
Step 2:
Using the Light/White 3″ squares and the Dark/Purple 3″ squares, make four Half Square Triangle (HST) units as shown. Trim/square up the units to 2.5″ squares.
You can find my tutorial for making HST units at https://quiltembroiderypdf.com/how-to-sew-a-basic-half-square-triangle-block

Step 3:
Repeat Step 2 only using the Medium/Blue and Dark/Blue 5″ squares. Trim/square up the units to 4.5″ square.

Corner Units:
Step 4:
Lay out two Step 2 Half Square Triangle units, one Light/White 2.5″ square, and one Dark/Purple 2.5″ square as shown in the picture below.

Step 5:
Sew the units into two rows and press the seam allowances away from the Half Square Triangle units.

Step 6:
Sew the two rows together and press the seam allowance. You can see in the picture below that I’ve used the tweak/twirl/furl method but you can press however you prefer. Repeat for a total of two Corner units.

Putting It All Together:
Step 7:
Lay out the Corner units, the Four Patch units, the large Half Square Triangle units, and the Dark/Blue 4.5″ square as shown in the picture below. From here the block goes together like a basic Nine Patch block.

Step 8:
Sew the units into three rows as shown below.

Step 9:
Press the seam allowances away from the large Half Square Triangle units as shown in the picture below.

Step 10:
Sew the three rows together to complete the block.

Step 11:
Press the seam allowances toward the center of the block as shown below.

Layout Ideas:
Here’s the basic 4 x 4 layout using colors similar to the tutorial.

This is the same layout as above but with every other block rotated to make this diamond design across the quilt.

This example is the same as the one above but with sashing and cornerstones added.

For something a little different, in this version an alternating chain block is used.

This is a monochromatic on-point layout with plain alternating blocks and setting triangles.

Another on-point layout with darker sashing and cornerstones and a light background fabric that is also used in the setting triangles.
