Welcome to the Raspberry Cheesecake quilt block tutorial! This sweet and simple 12″ finished block is as satisfying to make as its name suggests. Designed with beginners and time-crunched quilters in mind, it comes together quickly using just two classic units: half-square triangles and square-in-a-square blocks. The result is a bold, star-inspired design that looks complex but stitches up with ease. Whether you’re making a full quilt or just a few blocks for a sampler, this treat of a pattern is sure to become a favorite. Let’s get started!
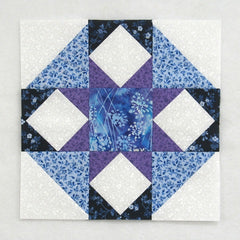
Fabric Requirements for a 12″ Finished Raspberry Cheesecake Quilt Block:
- Light/White: 2 – 5″ squares, and 4 – 4.5″ squares
- Medium/Blue: 2 – 5″ squares
- Medium/Purple: 1 – 4.5″ square
- Dark/Blue: 8 – 2.5″ squares
- Dark/Purple: 8 – 2.5″ squares

Sewing Directions:
Half Square Triangle Units:
Step 1:

Square in a Square Units:
Step 2:
Using a Light/White 4.5″ square, two Dark/Blue 2.5″ squares, and two Dark/Purple 2.5″ squares “snowball” the corners of the Light/White 4.5″ square. I like to work on two opposite corners at a time. Click Square in a Square for a detailed tutorial on making this unit.
Here are the steps:
- Mark a diagonal line from corner to corner on the back of the 2.5″ squares.
- Sew a Dark/Blue and a Dark/Purple 2.5″ square to opposite corners of the Light/White square along the marked line (top left image). Note the orientation of the marked lines.
- Match the corners of the 2.5″ squares and press.
- Open up the 2.5″ squares and trim the seam allowances.
- Refold (top right image).
- Repeat on the remaining two corners of the Light/White square (bottom images).
- Repeat for a total of four Square in a Square units.

Putting It All Together:
Step 3:

Step 4:

Step 5:
Press the seam allowances away from the Square in a Square units as shown in the picture below.

Step 6:
Sew the three rows together to complete the block.

Step 7:
Press the seam allowances toward the center of the block as shown in the picture below.

Layout Ideas:
Here’s your basic 4 x 4 layout with colors similar to the tutorial.

And the same layout but with coordinating narrow (1″) sashing and cornerstones added.

This layout idea uses an alternating chain block.

And this alternating design uses a simple Snowball block for every other block. The center of the Snowball block would be a great place for some fancy quilting, applique, or embroidery.

This is an on-point and alternating design the uses a chain block that extends into the setting triangles.

This is an on-point design with coordinating narrow sashing and cornerstones and background fabric for the setting triangles.

And this on-point layout shows what an alternating Snowball block could look like. I think this is my favorite layout.
