The Broken Wheel quilt block, also known as Mrs. Miller’s Favorite, is a classic and versatile 12″ design that’s perfect for quilters of all skill levels. Traditionally stitched with just a light and a dark fabric, this easy block takes on fresh energy when made in four colors, adding extra depth and movement to the motif.
The pattern comes together quickly with simple Square-in-a-Square units, rectangles, and one center square, creating a bold geometric design that looks beautiful in both traditional and modern color palettes.
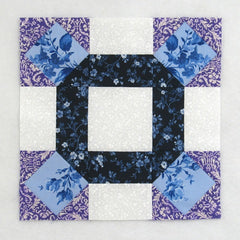
Fabric Requirements for a 12″ Finished Broken Wheel Quilt Block:
- Light/White: 1 – 4.5″ square, and 4 – 2.5″ x 4.5″ rectangles
- Medium/Blue: 4 – 4.5″ squares
- Medium/Purple: 12 – 2.5″ squares
- Dark/Blue: 4 – 2.5″ x 4.5″ rectangles, and 4 – 2.5″ squares

Sewing Directions:
Two Rectangles Unit:
Step 1:
Pair up the Light/White 2.5″ x 4.5″ rectangles and the Dark/Blue 2.5″ x 4.5″ rectangles and sew together along a long side. Press the seam allowance toward the Dark/Blue fabric as shown in the picture below. Repeat for a total of four units.

Square in a Square Units:
Step 2:
Using a Medium/Blue 4.5″ square, three Medium/Purple 2.5″ squares and a Dark/Blue 2.5″ square “snowball” the corners of the Medium/Blue 4.5″ square. I like to work on two opposite corners at a time. Click Square in a Square for a detailed tutorial on making this unit. Here are the first steps:
- Mark a diagonal line from corner to corner on the back of the 2.5″ squares.
- Sew a Dark/Blue and a Medium/Purple 2.5″ square to opposite corners of the Medium/Blue 4.5″ square along the marked line. Note the orientation of the marked lines.
- Match the corners of the 2.5″ squares and press.
- Open up the 2.5″ squares and trim the seam allowances.
- Refold.
- Repeat on the remaining two corners with two more Medium/Purple 2.5″ squares.

Step 3:
Repeat Step 2 for a total of four Square in a Square units.

Putting It All Together:
Step 4:
Lay out the Step 1 units, the Step 3 units, and the Light/White 4.5″ square as shown in the picture below. From here the block goes together like a basic Nine Patch block.

Step 5:
Sew the units into three rows.

Step 6:
Press the seam allowances toward the Step 1 units as shown in the picture below.

Step 7:
Sew the three rows together to complete the block.

Step 8:
Press the seam allowances away from the center of the block as shown in the picture below.

Layout Ideas:
Here’s the basic 4 x 4 layout using colors similar to the tutorial.

This is the same layout as above but with 4″ sashing and cornerstones added. I did another Square in a Square unit for the cornerstone.

Traditionally, this block is made with only a light and a dark fabric such as in the picture below.

This is an example of an alternating layout using a simple chain block for the alternate block. The Broken Wheel block also has a colored center square.

For a quick and simple quilt, this scrappy alternating layout uses a Snowball block for the alternate block.

This is an on-point layout with coordinating narrow (1″) sashing and cornerstones and plain background fabric for the setting triangles.
