The Valley Falls Square is an 18″ beginner-friendly block that looks far more complex than it is to make. Built entirely from squares, rectangles, and simple snowballed corners, it’s a straightforward sew with a stunning payoff.
Traditionally made in two contrasting colors, it creates beautiful secondary designs when blocks are joined together. Want even more visual interest? Add a third or fourth color and watch an entirely new pattern emerge across your quilt top.
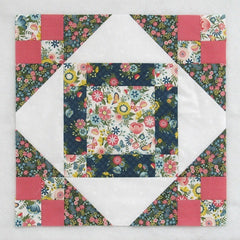
Fabric Requirements for an 18″ Finished Valley Falls Square Quilt Block:
- Fabric 1/White: 4 – 4.5″ x 10.5″ rectangles
- Fabric 2/Light Print: 1 – 6.5″ square, and 12 – 2.5″ squares
- Fabric 3/Green: 8 – 4.5″ squares
- Fabric 4/Pink: 8 – 2.5″ squares
- Fabric 5/Navy: 4 – 2.5″ x 6.5″ rectangles

Sewing Directions:
Four Patch Units:
Step 1:

Snowballed Rectangle Units:
Step 2:
Make four Snowballed Rectangle units using the Fabric 1/White 4.5″ x 10.5″ rectangles, and the Fabric 3/Green 4.5″ squares. This unit goes together just like half of a Snowball block except that you use a rectangle for the base. You can find my tutorial for making a Snowball block at https://quiltembroiderypdf.com/how-to-sew-a-basic-snowball-block
- Here are the first steps, going from top to bottom:
Mark a diagonal line from corner to corner on the back of a 4.5″ square and sew the 4.5″ square to one corner of the Fabric 1 rectangle along the marked line. Note the orientation of the marked line. - Match the corners of the 4.5″ square and press.
- Open up the 4.5″ square and trim the seam allowance. Because this is a larger size unit, I also sewed another seam about 1/2″ away from the marked line so I can get a bonus half square triangle (HST) to use in another project!
- Refold.

Step 3:
Repeat Step 2 on the other end of the Fabric 1 rectangles as shown below. Note the orientation of the marked line.

Step 4:
Repeat Steps 2 and 3 for a total of four Snowballed Rectangle units.

Center Unit:
Step 5:
Lay out the Fabric 2/Light Print 6.5″ square, the remaining four Fabric 2/Light Print 4.5″ squares, and the Fabric 5/Navy 2.5″ x 6.5″ rectangles in an uneven Nine Patch configuration as shown in the picture below.

Step 6:
Sew the units into three rows.

Step 7:
Press the seam allowances toward the Fabric 5/Navy rectangles as shown in the picture below.

Step 8:
Sew the three rows together.

Step 9:
Press the seam allowances away from the center of the unit as shown below.

Putting It All Together:
Step 10:
Lay out the Center unit, the Snowballed Rectangle units, and the Four Patch units as shown.

Step 11:
Once again, sew the units into three rows.

Step 12:
Press the seam allowances away from the Snowballed Rectangle units as shown below.

Step 13:
Sew the three rows together.

Step 14:
Press the seam allowances toward the center of the block as shown below.

Layout Ideas:
This is the basic 4 x 4 layout using colors similar to the tutorial.

And here’s that basic layout but with colored sashing and cornerstones added.

This is the traditional two-color block set in a 4 x 4 layout.

This alternating layout where every other block is a modified Double Nine Patch block. I’ve also added a third color.

This monochromatic alternating layout uses a Snowball block for the alternate block. I added in another color for a four-color block.

Here’s an on-point layout with the block extending into the setting triangles. I also used a four-color block for this setting.

Back to the two-color block for this on-point layout that uses the light fabric for the setting triangles.
